
EventR AI Inbox: Difference between revisions
No edit summary |
|||
| (11 intermediate revisions by 3 users not shown) | |||
| Line 1: | Line 1: | ||
== Overview == | == Overview == | ||
The EventR platform features integration with AI technology, to make managing your events, costs, and itineraries easier and more hassle-free | The EventR platform features integration with AI technology (sometimes referred to as Booking AI), to make managing your events, costs, and itineraries easier and more hassle-free. In the EventR Coordinator, an itinerary can be populated by '''''forwarding the bookings''''' to a designated email''.'' | ||
If your organisation is on the Standard plan or higher, you have access to the AI Inbox, which allows you to send emails containing itinerary-relevant documents to a provided '''eventr-bookings''' email, view AI-suggested itinerary items created based on those documents, and add them seamlessly to your itinerary. | |||
To access | To access the EventR AI Inbox go to the coordinator left side and click on '''AI Inbox'''. This opens the Booking AI page seen below. | ||
=== Forward Your Bookings === | === Forward Your Bookings === | ||
To get started, click the "Forward Your Bookings" button on the top right. | To get started, click the "Forward Your Bookings" button on the top right. | ||
[[File:Eventr-ai-forward.png|alt=Picture showing the AI Inbox, and where on the inbox the 'Forward Your Bookings' button can be found.|center|thumb|935x935px|You can also find this button on other pages, specifically those that allow you to view or add new itinerary items.]] | [[File:Eventr-ai-forward.png|alt=Picture showing the AI Inbox, and where on the inbox the 'Forward Your Bookings' button can be found.|center|thumb|935x935px|You can also find this button on other pages, specifically those that allow you to view or add new itinerary items.]] | ||
Ensure you have the correct itinerary selected. Copy the eventr-booking email address shown.Open your mail box and | Ensure you have the correct itinerary selected. Copy the eventr-booking email address shown. Open your mail box and send or forward your bookings to the copied email address. Note that the supported file types in email attachments are: | ||
* PDF | * PDF | ||
| Line 26: | Line 25: | ||
[[File:Eventr-wiki-ai-copy-email.png|alt=Image showing the Forward Your Bookings popup.|center|thumb|707x707px|Make sure the correct itinerary is selected before copying the email address, as each address is unique to each itinerary.]] | [[File:Eventr-wiki-ai-copy-email.png|alt=Image showing the Forward Your Bookings popup.|center|thumb|707x707px|Make sure the correct itinerary is selected before copying the email address, as each address is unique to each itinerary.]] | ||
Head back to the coordinator. A red dot on the Inbox AI icon on the sidebar | Head back to the coordinator. A red dot on the Inbox AI icon on the sidebar indicates there is an unread email on the Booking AI page. | ||
Go to Booking AI page.The ''Inbox tab'' displays all emails sent or forwarded to be reviewed for your itinerary.Inbox emails have status | Go to Booking AI page. The ''Inbox tab'' displays all emails sent or forwarded to be reviewed for your itinerary. Inbox emails have a status indicated by dots: | ||
* 🟡 Pending | * 🟡 Pending, currently being processed | ||
* 🟢 | * 🟢 Completed, ready for review | ||
* 🔴 | * 🔴 Failed, or timed out | ||
Archive tab | The Archive tab displays emails or proposed itinerary items that have been archived. You can archive an email or itinerary item with the Archive button on the right when hovering over a section. | ||
=== Add booking to the itinerary === | === Add booking to the itinerary === | ||
Each email has a summary displayed on | |||
==== Manually ==== | |||
Each email has a summary displayed on hovering on the email subject for successfully completed emails. Clicking on the subject also opens a summary overlay. You can see all the bookings that the AI has located by clicking the arrow on an email, dropping down the menu. | |||
[[File:Screenshot 2026-05-29 at 09.58.02.png|center|thumb|736x736px|image indicating booking AI email booking counter and summary on hovering the email subject]] | [[File:Screenshot 2026-05-29 at 09.58.02.png|center|thumb|736x736px|image indicating booking AI email booking counter and summary on hovering the email subject]] | ||
[[File:Email with more info2.png|alt=booking create button|center|thumb|749x749px|Image showing email itinerary, email name and create button to add the booking to the itinerary]]Click the "+" | [[File:Email with more info2.png|alt=booking create button|center|thumb|749x749px|Image showing email itinerary, email name and create button to add the booking to the itinerary]]Click the "+" button on any suggested itinerary item to add it to your itinerary. This should open the relevant section form. Make sure to double-check all the form information is correct, and make any edits needed. Then, click "''Save''". The booking is now successfully added to the itinerary.[[File:Eventr-wiki-ai-item-save.png|alt=An image showing a filled-out itinerary item from the AI Inbox.|center|thumb|706x706px]]Once the booking has been saved successfully you can press the "''Return to Ai Inbox''" button which will take you back to the ai inbox so you can pickup where you left off. | ||
[[File:EventRAIInbox.png|center|thumb|825x825px]] | |||
To delete or archive multiple emails use the ''Select All'' checkbox. You can also select individual emails, and individual itinerary items.[[File:Eventr-wiki-ai-inbox2.png|alt=An image showing a new email and itinerary item in the AI Inbox.|center|thumb|752x752px|You can use the checkboxes on the left of emails or their section items to perform deletion or archive operations on multiple items at once.]] | |||
==== Using Hotkeys ==== | |||
[[File:BookingAIHotkeys.png|thumb|Booking AI Hotkeys]] | |||
You can also create a booking using keyboard shortcuts. Use the Up and Down arrow keys to navigate between emails and booking entries, and the Left and Right arrow keys to expand or collapse each email. | |||
When a booking entry is selected, press '''C''' to create the booking. This performs the same action as clicking the '''+''' button. | |||
[[File:UsersNotFound.png|thumb|Users not found AI Inbox dialog example]] | |||
If creation is successful it will take you to the relevant booking page and you can press '''S''' to save the booking. You will then be returned to the AI Inbox with the next booking selected. So you can quickly add booking entries by pressing '''C''' and then '''S''' repeatedly. | |||
[[File:AIInboxMergeBooking.png.png|thumb|AI Inbox merge booking dialog example]] | |||
If the booking already exists after pressing '''C''' it will show a dialog asking you if you wish to merge it with an existing booking or create a new one. Pressing '''M''' will merge the booking. | |||
If the booking has users which cannot be found in your organisation after pressing '''C''' it will show a dialog asking you if you still wish to continue pressing '''C''' will go ahead and create a new booking.[[File:HotkeyUnderlined.png|thumb|Hotkeys underlined]] | |||
During the creation flow if you see any action text underlined this means it can be pressed using the letter that is underlined. | |||
[[File:AIInboxFlowDiagram.png|thumb|947x947px|AI Inbox flow diagram|center]] | |||
=== Forwarded Bookings | === Forwarded Bookings Format Cheat Sheet === | ||
EventR AI supports | EventR AI supports a broad list of file formats, but for an email to be processed successfully, certain pieces of information are useful for the AI to locate and set details correctly. If you're creating a spreadsheet of your itinerary and intending to use the AI to import your event, this section might be helpful. | ||
====== General Rule ====== | ====== General Rule ====== | ||
Members | Members added to the section should have first and last names. | ||
A | A section item must at least have a Start Time to be added successfully. | ||
Any notes are added as booking additional information which are only visible to the members in that specific booking. | Any notes are added as booking additional information which are only visible to the members in that specific booking. | ||
| Line 75: | Line 94: | ||
==== Parking ==== | ==== Parking ==== | ||
[[Category:3.5.0]] | |||
[[Category:AI]] | |||
[[Category:Booking AI]] | |||
Latest revision as of 14:18, 10 September 2026
Overview
The EventR platform features integration with AI technology (sometimes referred to as Booking AI), to make managing your events, costs, and itineraries easier and more hassle-free. In the EventR Coordinator, an itinerary can be populated by forwarding the bookings to a designated email.
If your organisation is on the Standard plan or higher, you have access to the AI Inbox, which allows you to send emails containing itinerary-relevant documents to a provided eventr-bookings email, view AI-suggested itinerary items created based on those documents, and add them seamlessly to your itinerary.
To access the EventR AI Inbox go to the coordinator left side and click on AI Inbox. This opens the Booking AI page seen below.
Forward Your Bookings
To get started, click the "Forward Your Bookings" button on the top right.

Ensure you have the correct itinerary selected. Copy the eventr-booking email address shown. Open your mail box and send or forward your bookings to the copied email address. Note that the supported file types in email attachments are:
- XLS/XLSX
- DOC/DOX
- PPTX/PPT
- CSV
- TXT
- HTML
- XML
- EML
- JPG
- PNG
- BMP

Head back to the coordinator. A red dot on the Inbox AI icon on the sidebar indicates there is an unread email on the Booking AI page.
Go to Booking AI page. The Inbox tab displays all emails sent or forwarded to be reviewed for your itinerary. Inbox emails have a status indicated by dots:
- 🟡 Pending, currently being processed
- 🟢 Completed, ready for review
- 🔴 Failed, or timed out
The Archive tab displays emails or proposed itinerary items that have been archived. You can archive an email or itinerary item with the Archive button on the right when hovering over a section.
Add booking to the itinerary
Manually
Each email has a summary displayed on hovering on the email subject for successfully completed emails. Clicking on the subject also opens a summary overlay. You can see all the bookings that the AI has located by clicking the arrow on an email, dropping down the menu.


Click the "+" button on any suggested itinerary item to add it to your itinerary. This should open the relevant section form. Make sure to double-check all the form information is correct, and make any edits needed. Then, click "Save". The booking is now successfully added to the itinerary.

Once the booking has been saved successfully you can press the "Return to Ai Inbox" button which will take you back to the ai inbox so you can pickup where you left off.

To delete or archive multiple emails use the Select All checkbox. You can also select individual emails, and individual itinerary items.

Using Hotkeys

You can also create a booking using keyboard shortcuts. Use the Up and Down arrow keys to navigate between emails and booking entries, and the Left and Right arrow keys to expand or collapse each email.
When a booking entry is selected, press C to create the booking. This performs the same action as clicking the + button.

If creation is successful it will take you to the relevant booking page and you can press S to save the booking. You will then be returned to the AI Inbox with the next booking selected. So you can quickly add booking entries by pressing C and then S repeatedly.

If the booking already exists after pressing C it will show a dialog asking you if you wish to merge it with an existing booking or create a new one. Pressing M will merge the booking.
If the booking has users which cannot be found in your organisation after pressing C it will show a dialog asking you if you still wish to continue pressing C will go ahead and create a new booking.

During the creation flow if you see any action text underlined this means it can be pressed using the letter that is underlined.

Forwarded Bookings Format Cheat Sheet
EventR AI supports a broad list of file formats, but for an email to be processed successfully, certain pieces of information are useful for the AI to locate and set details correctly. If you're creating a spreadsheet of your itinerary and intending to use the AI to import your event, this section might be helpful.
General Rule
Members added to the section should have first and last names.
A section item must at least have a Start Time to be added successfully.
Any notes are added as booking additional information which are only visible to the members in that specific booking.
Flights
- Flight Number and Flight Date
- Departure and Arrival date and time,
- Departure and Arrival Airport codes
- Reference Number or seat number if provided
- Passenger specific information can be added as additional information
Accommodation
- Hotel name
- Guest names should ideally be in the same column.
- Hotel Default Check-in and Check-out date and times if all guests have the same check-in and out date and time
- Guest Check-in and Check-out date and times if there is a variation of the check-in and check-out date and time
- Booking reference ,room type or additional information if provided[Optional]
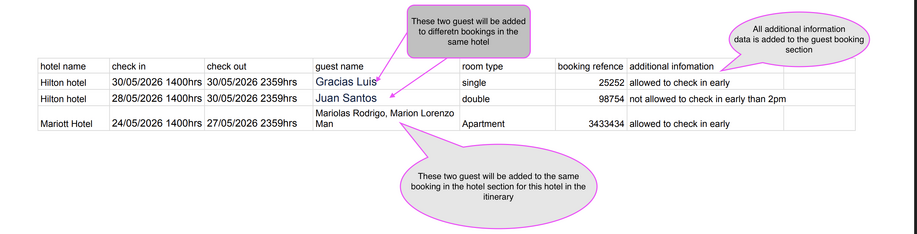
Sample image showing hotel key information for successful AI processing

Hire/Rental Car

Transport
